Tuesday, June 24, 2014

Office 365 public folders reject emails

Since two days mails to Office 365 (and probably MS hosted exchange too) are rejected.

The error message returned by the server have this error in them:

Remote Server returned '550 5.7.1 RESOLVER.RST.AuthRequired; authentication required [Stage: CreateMessage]'

 It seems that MS did change some policy/settings in the public folder management and did forgot to inform users and sys admins.

In non-hosted exchange environments, you had to set the CreateItem right on the email enabled public folders which should be able to receive (external) emails.
In office365 this was not required until a few days ago.

There are two ways to set the corresponding rights. For me, the way via Outlook did not work, since I did not see the ACL on the public folders in question.
But the way via PowerShell works just fine.

Do it the easy way (if it works)

Just open outlook and go to your email enabled folder(s) and do add the CreateMessage right for Anonymous access, as show in the following two printscreens.


If this does not work (or you have a lot of email enabled public folders), then you have to ressort to PowerShell

Do it via PowerShell

1. Start powershell as administrator (Only required if you need to change the execution policy )
2. Set the execution policy to allow signed remote code

Set-ExecutionPolicy RemoteSigned

3. Enter credentials for office365

$LiveCred = Get-Credential

4. Make a connection to office365

$Session = New-PSSession -ConfigurationName Microsoft.Exchange -ConnectionUri https://ps.outlook.com/powershell/ -Credential $LiveCred -Authentication Basic -AllowRedirection

5. Import the cloud commands in your local powershell

Import-PSSession $Session –AllowClobber

6. Now set the CreateMessage right on all public folders recursively

Get-PublicFolder "\" -Recurse | Add-PublicFolderClientPermission -User Anonymous -AccessRights CreateItems
  
This changes the rights for all public folders. If you wish to set the right only for one public folder, thenyou can do it the same way, but instead of using the command in setp 6, you speicfy this command:

Add-PublicFolderClientPermission <path-to-folder> -User Anonymous -AccessRights createitems

Wednesday, June 4, 2014

Office 365 activation error 0x80070005

When you install Office 365 and then start it, it might occure that the error messages 0x80070005 is shown and you are unable to activate it.

Usually you don't have to activate Office 365, since it is already "bound" to your online account.
So Office is automatically activated.


When you see this dialog, then there is a problem with rights on your system.
The simplest way to solve the problem is to run Word or Excel once as administrator.
Just right click on word and then select "Run as administrator" and you won't even see the activation stuff. It will be activated in the background and after closing word you just can use the office 365 suite as usual.

Monday, June 2, 2014

App development with GWT, Cordova and Netbeans Part 4

This is the forth part of my blog series on how to develop mobile apps with GWT, Cordova and Netbeans. The initial description can be found here.
In the previous parts we did create a MGWT project and did put a "Hello world" button on the screen and finaly did build the native apps for android and windows phone.

Web apps are all nice, but often you wish to access some features of your mobile device which is not available to web applications. Some common things are the camera, sensors and so on.

With cordova/phonegap we fortunally can use these devices via native plugins.
Just a warning: Any plugin you use must be available on all target platforms, otherwise you will get in troubles. (There are ways to handle such situations, but they are outside the scope of this tutorial)

The first step to allow such access, is to teel the maven pom.xml that we wish to use phonegap "features".
Just add this dependency in your pom.xml file:

<dependency>
    <groupId>com.googlecode.gwtphonegap</groupId>
    <artifactId>gwtphonegap</artifactId>
    <version>2.4.0.0</version>
</dependency>


The second think to change, is you index.html file.
There you have to specify that cordova.js is started, so the html<->native bridge is activated.

Somewhere in your index.html you have the line which starts the gwt java script.
It looks like this:
<script type="text/javascript" language="javascript" src="mgwt1/mgwt1.nocache.js"></script>

Before that line, add the call to the cordova.js file, so the phonegap environment is initialized.

It should then look like this:

<script type="text/javascript" language="javascript" src="cordova.js"></script>
<script type="text/javascript" language="javascript" src="mgwt1/mgwt1.nocache.js"></script>

It is important that the cordova.js in loaded before the GWT script, because the initialisation order is important.

Finally you must tell the phonegap build service to include some native plugins, otherwise the cordova.js will be missing in the package.
For this add these lines to your src/main/phonegap-build/config.xml:

<feature name="http://api.phonegap.com/1.0/notification"/>
<feature name="http://api.phonegap.com/1.0/device"/>
<gap:plugin name="org.apache.cordova.device" version="0.2.8" />
<gap:plugin name="org.apache.cordova.dialogs" version="0.2.6" />

With these four lines you include the device information features (You can retrieve the platform informations) and show native notifications.

In the start() method of your "java" class, you add the initialisation of the phonegap environment.

PhoneGap phoneGap = GWT.create(PhoneGap.class);
boolean isPhoneGap= phoneGap.isPhoneGapDevice();
           
if (isPhoneGap)
{
    phoneGap.addHandler(new PhoneGapAvailableHandler()
    {
        @Override
        public void onPhoneGapAvailable(PhoneGapAvailableEvent event)
        {
            // Here you have the native "bridge" up and running
        }
    });
   phoneGap.addHandler(new PhoneGapTimeoutHandler()
   {
       @Override
       public void onPhoneGapTimeout(PhoneGapTimeoutEvent event) 
       {
           //can not start phonegap - something is for with your setup
       }
    });
}
The last step required, is tell GWT to use the phonegap API too.
So in your <project.gwt.xml uncomment this line:

<inherits name="com.googlecode.gwtphonegap.PhoneGap"/>

With this you now have access to all the features as described here.
Of course you need to speicfy access rights for you app, otherwise you will not be allowed to interact with the native phone system. (Camera etc.)

You can download the sample project from this place.

I hope you enjoyed this tutorial.
If you struggle somewhere, please drop me a note, so I can enhance the tutorial.


App development with GWT, Cordova and Netbeans Part 3

This is the first part of my blog series on how to develop mobile apps with GWT, Cordova and Netbeans. The initial description can be found here.
In the previous parts we did create a MGWT project and did put a "Hello world" button on the screen.
This is shown just nice on any browser, but is not yet a native mobile app.
In this part we will use the adobe phonegap build service to package our small web app as a native app which can be put in a app store of the big players.
Packaging the app for the different target systems is a tedious work, since you must install the different SDK, in the correct versions. And you can't develop all version on a single platform. For example iOS apps need a OS-X system to build them.

Fortunally there exists a build service from adobe which allows you to upload your web app as zip file (or take the source from a git repository) and then build the app for all the target platforms you wish.

The free version of the service allows you to build one private app and as many opensource apps as you wish.
If you need to build more private (or better closed source ) apps, then you can buy a upgrade for $9.99/Month which allows you to build up to 25 private applications.

We will continue with the free account and use this to build our closed source app, directly from inside netbeans. So you won't have to upload the zip file manually and can fully automate your builds.

The first step to build a native app, is extending the maven build to include the build service. Fortunally Chris has written a maven plugin which handles this very well.

In your pom.xml you just add the dependency to the new plugin:

<plugin>
    <groupId>com.github.chrisprice</groupId>
    <artifactId>phonegap-build-maven-plugin</artifactId>
    <version>0.0.7</version>
    <executions>
        <execution>
            <id>phonegap-build</id>
            <goals>
                <goal>clean</goal>
                <goal>build</goal>
            </goals>
        </execution>
    </executions>
    <configuration>
   
    <platforms>            
            <!-- <platform>ios</platform> -->
       
    <platform>android</platform> 
            <platform>winphone</platform>
        </platforms>
    </configuration>                                   
</plugin>

With this your build process will push the zip file to the adobe build service and retrieve the final platform packages.
Since the build service is password protected, you need to specify your credentials.

This can simply be done by specifying which server should be used for building in your pom.xml file. (Almost on top of it)

<properties>
    <gwtversion>2.5.0</gwtversion>
    <phonegap-build.server>phonegap-build</phonegap-build.server>
</properties>

The second part is to specify your personal credentials. As it's a bad idea to put them in the pom.xml, you should put them in default maven settings file.
The maven settings file is called settings.xml and is usually located in the .m2 directory of the users home folder.

The content should look like this:

<settings xmlns="http://maven.apache.org/SETTINGS/1.0.0" xmlns:xsi="http://www.w3.org/2001/XMLSchema-instance"
          xsi:schemaLocation="http://maven.apache.org/SETTINGS/1.0.0 http://maven.apache.org/xsd/settings-1.0.0.xsd">
    <servers>
        <server>
            <id>phonegap-build</id>
            <username>yourlogin@adobe.com</username>
            <password>MySecurePassword</password>
        </server>
    </servers>
</settings>


The last step before starting the build is to specify a config.xml file, to instruct the build service what should be done.
This file is located under src/main/phonegap-build and should have this content:

<?xml version="1.0" encoding="UTF-8"?>
    <widget xmlns = "http://www.w3.org/ns/widgets"
        xmlns:gap = "http://phonegap.com/ns/1.0"
        id        = "org.company.project"
        versionCode=""
        version   = "1.0.0">
        <name>My test project</name>
        <description></description>
        <author href="http://www.aarboard.ch" email="support@aarboard.ch">André Schild</author>
        <preference name="phonegap-version" value="3.4.0" />
        <preference name="orientation" value="default" />
        <preference name="fullscreen" value="true" />
        <preference name="target-device" value="universal" />
        <preference name="webviewbounce" value="true" />
        <preference name="prerendered-icon" value="true" />
        <preference name="stay-in-webview" value="true" />
        <preference name="ios-statusbarstyle" value="black-opaque" />
        <preference name="detect-data-types" value="true" />
        <preference name="exit-on-suspend" value="true" />
        <preference name="show-splash-screen-spinner" value="true" />
        <preference name="auto-hide-splash-screen" value="true" />
        <preference name="EnableViewportScale" value="false" />
        <preference name="MediaPlaybackRequiresUserAction" value="false" />
        <preference name="AllowInlineMediaPlayback" value="false" />
        <preference name="BackupWebStorage" value="cloud" />
        <preference name="TopActivityIndicator" value="gray" />
        <preference name="KeyboardDisplayRequiresUserAction" value="true" />
        <preference name="HideKeyboardFormAccessoryBar" value="false" />
        <preference name="SuppressesIncrementalRendering" value="false" />
        <preference name="android-minSdkVersion" value="7" />
        <preference name="android-installLocation" value="auto" />
        <preference name="SplashScreenDelay" value="5000" />
        <preference name="ErrorUrl" value=""/>
        <preference name="BackgroundColor" value=""/>
        <preference name="KeepRunning" value="false"/>
        <preference name="DisallowOverscroll" value="false"/>
        <preference name="LoadUrlTimeoutValue" value="20000" />
        <preference name="disable-cursor" value="true" />
        <gap:platform name="android" />
        <gap:platform name="winphone" />
        <access origin="http://127.0.0.1*" />
    </widget>


You can now rebuild your project and should have the two app packages in the target/phonegap-build folder.
One is a .apk file for android, the other a .xap file for windows phone.

You could now transfer these files to your mobile device and test them, or you can go to the adobe build service page and scan the QR code from there.


If you modify your code, you can then just rebuild the app and reinstall it on your phone.
If subsequent builds fail, then you have to specify which APP number to use. Otherwise the build service thinks you wish to cretae multiple private apps.

To prevent this, you note the app id from the build service (see screenshot above) and then add this to your pom.xml file in the plugin section.

    </platforms>
    <appId>9xxxxxx</appId>                            </configuration>                   

As you may have noted, we did now build the app for Android and Windows phone. When you wish to build your app for iOS, then you need a developer account from apple. This account costs $99.-/Year.
You have to create a account here and then register for iOS development. You will then receive a signing key, with which you have to sign ANY iOS application you develop. There is no other way to install software on your iOS devices (unless you root the device)

In the next and last part of the serie we will look at what is required to access native features for your mobile device. In short you need to integrate the cordova plugins and initialize them correctly.

App development with GWT, Cordova and Netbeans Part 2

This is the second part of my blog series on how to develop mobile apps with GWT, Cordova and Netbeans. The initial description can be found here.

In the first part we did create a basic MGWT project from a maven template and did run it in the web browser of our choise.
It did just display a grey divider line on the screen, similiar to this.

Now we wish to show some real content on the page. For this we need to mobify the main class of the application.
The main application class is defined in your <project>.gwt.xml file.
Look for the  <entry-point> xml tag, this is where your application starts.

You can now open this java file and search for the start() method.
The simplest way to get our hello world is to modify the start() method to only show a button with hello world as caption.

So your start() method should look like this:

private void start() {
       
      //set viewport and other settings for mobile
            MGWT.applySettings(MGWTSettings.getAppSetting());
            LayoutPanel mainPanel= new LayoutPanel();
            mainPanel.setWidth("100%");
            Button button = new Button("Hello world");
            button.setWidth("100%");
            mainPanel.add(button);
            RootPanel.get().add(mainPanel);       
    }


Don't delete the onModuleLoad method, this one is required.
After a rebuild und run of the project, you should now see the "Hello world" button on your browser, similar to this printscreen.


Initial description
Part 1
In the next part we will now go to the magic, and put this in a android and windows phone app.

App development with GWT, Cordova and Netbeans Part 1

This is the first part of my blog series on how to develop mobile apps with GWT, Cordova and Netbeans. The initial description can be found here.

To develop with Netbeans, of course you need the Netbeans IDE.
I suggest downloading the latest version 8.0 from the official website and install it. Just make sure you take the "All" edition, which includes support for Java and HTML5.

When the IDE is installed, you should download and install the GWT plugin for netbeans. It can be downloaded directly from the netbenas plugins web page.

The plugin then requires the GWT environment. If not yet installed, download it from here (The GWT SDK is enough) and unpack it somewhere on your local disk.

After this your development environment is ready to start.

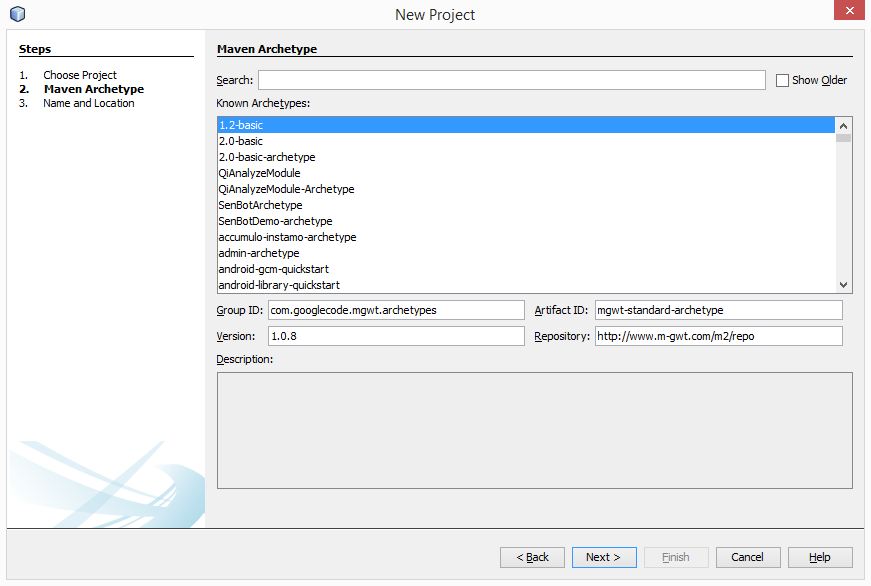
When netbeas is started you first create a new maven project target, select "Maven" and then "Project from Archtype"

Then enter the specified values below in the 4 text fields to generate a MGWT target:
 Group-ID: com.googlecode.mgwt.archetypes
Artifact ID: mgwt-standard-archetype
Version: 1.0.8
Repository: http://www.m-gwt.com/m2/repo


Now you specify where to store your new project and your own "namespace", usually something like com.company and the project name.


After finishing you have the skeleton for the MGWT project ready. In the project name you see "Archtype generated mgwt app", with a right click on the project you can open the project dialog and put in a meaningfull project name.


So you are now ready to run the project.
Just right click on the project and select "Run"


It now asks you on which application server you with to run it, don't be worried, you won't need it for the final deployment. But for development purposes your code needs to be accessible via a http connection. So just select one of the installed application servers. (When you select "Remember Permanently" it won't aks you over and over again)


Netbeans now invokes the GWT compiler and trys to build your web application.


Unfortunaly the build will fail, complaining about a missing clientcode.xml

------------------------------------------------------------------------
BUILD FAILURE
------------------------------------------------------------------------
------------------------------------------------------------------------
Failed to execute goal org.apache.maven.plugins:maven-assembly-plugin:2.2-beta-5:single (assemble) on project mgwt1: Error reading assemblies: Error locating assembly descriptor: src/main/assembly/clientcode.xml

[1] [INFO] Searching for file location: C:\Develop\Sourceforge\mgwt1\src\main\assembly\clientcode.xml

[2] [INFO] File: C:\Develop\Sourceforge\mgwt1\src\main\assembly\clientcode.xml does not exist.


The clientcode.xml contains some informations on what should be packaged for the final app.
Just create the clientcode.xml in the folder src/main/assembly with this content:

<assembly>
  <id>clientcode</id>
  <includeBaseDirectory>false</includeBaseDirectory>
  <formats>
    <format>zip</format>
  </formats>
  <fileSets>
   <fileSet>
   <directory>target/${project.artifactId}-${project.version}</directory>
   <includes>
  <include>**/*.js</include>
   <include>**/*.png</include>
  <include>**/*.rpc</include>
  <include>**/*.html</include>
  <include>**/*.gif</include>
  </includes>
   <outputDirectory></outputDirectory>
   </fileSet>
  </fileSets>

</assembly>


Now you can run the project once more, and if your default browser is a webkit based browser you will see the screen similar to this:


If you instead receive a error message like :
ERROR: Possible problem with your *.gwt.xml module file.
The compile time user.agent value (safari) does not match the runtime user.agent value (gecko1_8). Expect more errors


then you have started your web app in another browser which is not based on webkit.
If you wish to continue using your belowed browser, then just change the compile option in the <project>.gwt.xml file. Just remove the line <set-property name="user.agent" value="safari" /> and re run your project.


This is the first step in building a GWT based mobile app with netbeans.
In the second step we will change the content of the start screen, you we see our belowed "Hello World" text.