Thursday, April 21, 2022

MS SQL Server can't register SPN when started with a service account

When you change the service account used by the MS SQL server services, they often are not abel to register the corresponding SPN in active directory.

You should see these messages in the SQL server log when it's working correctly

The SQL Server Network Interface library successfully registered the Service Principal Name (SPN) [ MSSQLSvc/SQL.testdomain.in:24629 ] for the SQL Server service.

SQL Server error log for default instance

In the case you get errors like this, the SPN registration (and therefore later on the lookup via AD) is not working

The SQL Network Interface library could not register the Service Principal Name (SPN) for the SQL Server service. Error: 0x54b. Failure to register an SPN may cause integrated authentication to fall back to NTLM instead of Kerberos. This is an informational message. Further action is only required if Kerberos authentication is required by authentication policies. 

 For a service account to be able to register the SPN you need to set these rights on the AD user account:

Now you just have to restart the MS SQL service, and it should be able to register the SPN in AD.

If you still receive the error message, then it's because the corresponding SPN's are still/already registered on another object (mostly the computer account of the MS SQL server) and the service account has no rights to modify them (Since we did only allow it to modify it's own rights)

So the simplest way to do this is to use the setspn command to remove the stale entries.

You can look what SPN entries are registered for a specific AD object with this command:

setspn -l domain\sql-server

You will then probably see something like this:

  • MSSQLSvc/ sql-server.domain.local
  • MSSQLSvc/ sql-server.domain.local:1433 

So you can also remove them from the object with:

setspn -d  MSSQLSvc/sql-server.domain.local domain\sql-server

setspn -d  MSSQLSvc/sql-server.domain.local:1433 domain\sql-server

Now you restart the MS SQL service and it should be able to register.

If it still throws errors, then the SPN is probably assigned to another account. In that case just try to add the spn manually, and it will tell you where the duplicate SPN can be found.

setspn -a  MSSQLSvc/sql-server.domain.local domain\service-account

This can also happen when you switch from one service account to another.


Monday, February 28, 2022

Outlook does not allow you to subscribe to all calendars of distribution lists

 In previous Outlook versions you could subsribe to all calendars of all members of a distribution group, by just selecting it in the address book.

With current Outlook versions this mostly don't work and you receive the message that you have to subscribe to the calendars one by one.

In german this is the error message you get: 

The same behaviours also occurs, when you try to subscribe to all rooms at the same time.

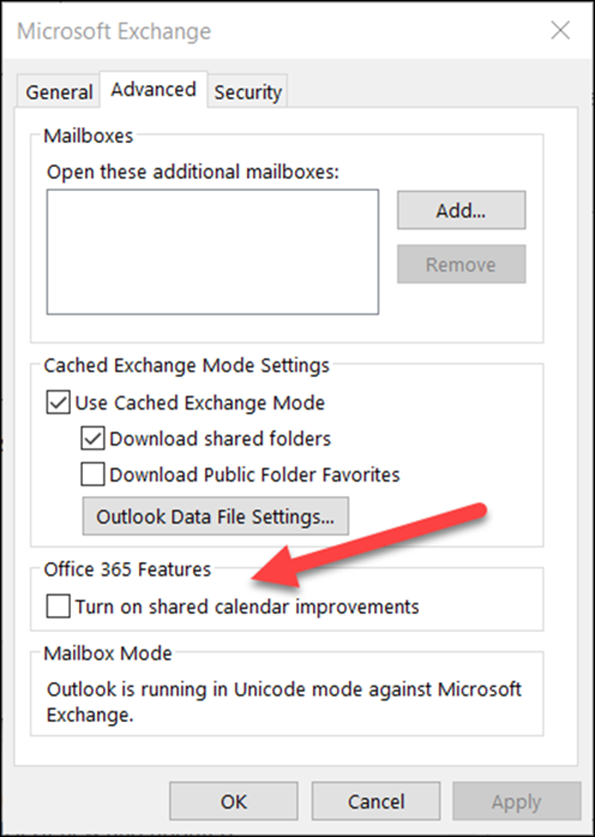
To get this working again, you have to disable the "Shared calendar improvements", at least for the duration when subscribing to the calendars.

When this checkbox is disabled, you can again subscribe multiple calendars in one step.

You can turn on the shared calendar improvements with a checkbox.

https://support.microsoft.com/en-us/office/outlook-calendar-sharing-updates-c3aec5d3-55ce-4cea-84b0-80aab6d8dc26

Please be aware, that you should reenable this setting after subscription, otherwise your subscribed calendard will get lost when you have no connection to the server, or working offline.


 And a small side note: The GPO policy mentioned in the linked article no longer exists, so don't look for it in current admx templates.

Also setting the mentioned policy registry key seems to have no effect with current outlook versions as of 2022.

There is a new setting for REST communication with calendar server, but this seems to not solve the subscribe problem.

Friday, October 15, 2021

Reactivate Zabbix agent in TrueNAS after update

When you have installed the Zabbix agent as mentioned in my previous post, then you will notice that Zabbix gets deactivated wqhen you install TrueNAS updates.

To get the agent running again, you only need to reactivate it in rc.conf

  1. Enable daemon
    echo 'zabbix_agentd_enable="YES"' >> /etc/rc.conf
  2. Start daemon:
    /etc/rc.d/zabbix_agentd start
  3. Make config files persistent and survive reboots:
    cp /etc/rc.conf /conf/base/etc/ 
    cp /etc/rc.d/zabbix_agentd /conf/base/etc/rc.d/
    mkdir /conf/base/etc/zabbix_agentd
    cp /etc/zabbix_agentd.* /conf/base/etc/

Of course it's a good moment to install the latest zabbix agent too.

For this take the latest version matching your server version and copy the /bin and /sbin to /usr/local and restart the agent.

If someone has an idea, on how to make the "Enable daemon" step survive a minor TrueNAS upgrade, I would be glad for some hints ;)

Monday, October 11, 2021

ERROR: (gcloud.iam.service-accounts.keys.create) FAILED_PRECONDITION: Precondition check failed.

When you try to create a key for a service account in google cloud via the gcloud iam service-accounts keys create command, it can occur that you receive this error ERROR: (gcloud.iam.service-accounts.keys.create) FAILED_PRECONDITION: Precondition check failed.

Unfortunally searching for this error does not show up much, and adding --verbosity=debug does not turn up more information.

The reason for this error is, that a single service account can have a maximum of (currently) 10 active keys.

If you try to create one more, then you will receive the above error message.

The only way to work arround the problem is to remove older keys, which are (hopefully) no longer used.

You can do this either via the gui or the gcloud iam service-accounts keys delete command


Found the solution thanks to https://gist.github.com/maelvls/c23558b717422c4c648f4258a7f2fb1 since in the google documentation there is no reference to a limit on the number of keys per service account

Wednesday, October 21, 2020

Install Zabbix agent on TrueNAS

 In my previous article from 2018 I did mention how to install teh Zabbix agent on FreeNAS.

Since then two years are passed and FreeNAS has been replaced by TrueNAS provides the same functionality in a new version with a new name.

The steps for installation are remained the same, but you won't need to build the agent package yourself, you can use the packages provided from Zabbix for FreeBSD.

So lets see what you have to do now:

1. Download the binary package from the Zabbix webpage at https://www.zabbix.com/de/download_agents?version=4.0+LTS&release=4.0.25&os=FreeBSD&os_version=11.2&hardware=amd64&encryption=GnuTLS&packaging=Archive

It's no problem that FreeBSD 12.x is not listed, the 11.2 packages still work

2. Unpack the /bin and /sbin folders into /usr/local of your TrueNAS server

3. Unpack the /conf/* into /etc

4. Create a use and group zabbix so your agent wont run as root, you need to do this via GUI, otherwiese the account will be gone after reboot

5. Edit your /etc/zabbit_agentd:conf to match your needs

6. Enable daemon

echo 'zabbix_agentd_enable="YES"' >> /etc/rc.conf  
 
Create /etc/rc.d/zabbix_agentd:
#!/bin/sh

# PROVIDE: zabbix_agentd
# REQUIRE: DAEMON
# KEYWORD: shutdown
#
# Add the following lines to /etc/rc.conf.local or /etc/rc.conf to
# enable zabbix_agentd:
#
# zabbix_agentd_enable (bool): Set to NO by default.  Set it to YES to
#         enable zabbix_agentd.
#

. /etc/rc.subr

name="zabbix_agentd"
rcvar=zabbix_agentd_enable
start_precmd="zabbix_precmd"
required_files="/etc/zabbix_agentd.conf"

# read configuration and set defaultsc
load_rc_config "$name"
: ${zabbix_agentd_enable="NO"}
#: ${zabbix_agentd_pre:=/etc/${name}.pre.sh}

zabbix_agentd_conf="/etc/zabbix_agentd.conf"

if [ ! -z "$zabbix_agentd_conf" ] ; then
  zabbix_agentd_flags="${zabbix_agentd_flags} -c ${zabbix_agentd_conf}"
  required_files=${zabbix_agentd_conf}
fi

zabbix_precmd()
{
  if [ ! -z "$zabbix_agentd_pre" ] ; then
    if [ -e $zabbix_agentd_pre ] ; then
      . $zabbix_agentd_pre
    fi
  fi
}

command="/usr/local/sbin/${name}"

run_rc_command "$1"  run_rc_command "$1"
 Make executable:
  1. chmod +x /etc/rc.d/zabbix_agentd
    
  2. Start daemon:
    /etc/rc.d/zabbix_agentd start
    
  3. Make config files persistent and survive reboots:
    cp /etc/rc.conf /conf/base/etc/
    cp /etc/rc.d/zabbix_agentd /conf/base/etc/rc.d/
    mkdir /conf/etc/zabbix_agentd
    cp /etc/zabbix_agentd.* /conf/base/etc/
    cp /etc/zabbix_agentd.* /conf/base/etc/


    Zabbix configuration

    Use the template from the zabbix wiki for the host monitoring http://zabbix.org/wiki/File:Template_OS_FreeNAS.xml
     

Tuesday, September 1, 2020

Use perdition as ssl offload proxy for imap / pop and managesieve

 In modern setups you often have an ingress controller, which does the ssl termination of the connections and then routes the traffic to the correct backend(s)

For kubernetes and http(s), often nginx is used for that task.

When you wish to do the same for imap and/or pop, then it also possible to use nginx for this.

https://docs.nginx.com/nginx/admin-guide/mail-proxy/mail-proxy/

But the main drawback is, that you need to implement some authentication and routing based on an http request.Also the managesieve protocol isn't supported.

If you don't wish to do the hassle with this, or you haven't the required infos to do it, then perdition can handle this be used as a full imap/pop/managesieve proxy.

The basic setup is quite simple, but has a few things to be aware of, when using it with ssl and/or ipv6.

When you enable ssl, then you have to specify the certificate files.

Usually something like this:

ssl_ca_file /etc/postfix/ssl/ssl-root.ca
ssl_cert_file /etc/postfix/ssl/myserver.crt
ssl_key_file /etc/postfix/ssl/myserver.key

When you then start perdition, it will probably log some warning about not beeing able to read the DH parameters from the certificate file. 

could not read DH params from cert file

Modern OpenSSL configurations require Diffie-Hellman values to generate secure keys in the exchange.

If your certificate does not have these embedded in it, you can generate them yourself and add them to the certificate.

openssl dhparam -out dhparams.pem 4096

Then just append the content of the dhparams.pem file to your .crt file and perdition has the required DH values.

The second thing you might struggle with, when you start perdition on an IPv6 enable host, then perdition will only bind the IPv4 address and not to the IPv6 address.

Unfortunally the documentation is lacking in this area, as how to bind the IPv6 ports too.

The correct syntax is to use this in the perdition.imap4s etc. files:

bind_address 88.xx.xx.xx,"[2a01:xxx:xxx:xxx::xxx]"

Please note that you must specify both IPvç and IPv6 addresses, and also that the IPv6 "[::]" will not work.

You have to specify the IPv6 address and enclose it in "[...]", including the " characters.

Configuring perdition as managesieve proxy is also not very well documented.

Specifying the sieve capabilities is rather tricky, here a wroking example:

capability \
"\"IMPLEMENTATION\" \"Cyrus timsieved\"  "\
"\"SIEVE\" \"comparator-i;octet "\
"comparator-i;ascii-numeric "\
"fileinto "\
"reject "\
"vacation "\
"imapflags "\
"notify "\
"envelope "\
"relational "\
"regex "\
"subaddress "\
"copy\"  "\
"\"SASL\" \"PLAIN\""


The important things to note in this:

Use \" to delimit the capabilities, and use two spaces to delimit the capability lines .

Have a look at the base config file perdition.conf as a staring point

If you have clients using K9 mail (And probably other too), then you might remove all "AUTH=..." settings from the imap capability string.

https://lists.vergenet.net/pipermail/perdition-users/2011-August/002547.html

Please also see my upcomming post  on monitoring perdition with Zabbix


Tuesday, August 25, 2020

Automatically remove write protection from USB Disks in Backup Exec

Veritas BackupExec has a default, which flags disks which have been offline for more than 32 days as write protected.

BackupExec has expiration dates for each backup you have done. Once this date is reached, BackupExec does free up the disk space and deletes the old backups.

The idea behind this is, that these are disks which contain older backups, which should not automatically be purged from disk.Otherwise, when you connect the disk with the monthly backup of january on the server in june, for some restore, then BackupExec would remove these old backup sets.

That's usually not what you wish to have, this is why in the default this 32 day rule exists.

Of course you can tell BackupExec to either not set this write protection at all, or only for some longer time period. There is also a dangerous option, to allow BackupExec to delete all expired backup sets.

The default is usually fine, until you reinsert your january 2019 disk in january 2020. Then the disk will be write protected and you will have to remove the write protection first, or your backup jobs will fail.

Since this is a manual action you have to do on a regular basis, you can also automate it with some scripts.

With powershell und the windows task scheduler you can remove the write protection of the connected drives.

One important thing to note is, you must schedule the powershell script via task scheduler, if you define it as an "Run before job" in BackupExec, then the job will not start since it sees no writable disk in then system, and also does not start the "pre job run script"

This is the powershell script, which remove the write protection on all online disks in BackupExec, store it in a location on C:\...., for example as "c:\Program Files\Veritas\Backup Exec\Scripts\TurnWriteProtectedOff.ps1"

<# This script does remove the virtaul write protection on any online disks
   This way USB disks which had not been online for a long time wil be overwritable again
   2020 a.schild@aarboard.ch
#>
Import-Module "c:\Program Files\Veritas\Backup Exec\Modules\BEMCLI\BEMCLI.Scripts.psm1"

$disks= Get-BEStorageDevice
foreach ($d in $disks) {
    if ($d.Servers.IsOnline -eq "true") {
        # $d | Format-Table Name
        $d | Set-BEDiskStorageDevice -VirtualWriteProtectionEnabled $false
    }
}


In your task scheduler you then schedule it to be run 5-10 minutes before the regular backup job.

As command specify your powershell.exe as "C:\Windows\System32\WindowsPowerShell\v1.0\powershell.exe"

In the script argugemt you pass:

 -File "C:\Program Files\Veritas\Backup Exec\Scripts\TurnWriteProtectedOff.ps1"

And define it to be run always, with no network resources and with highest priority.